XDebug integration with Netbeans has always been flaky for me. It works one minute, and not the next time round. In this post, I’ve outlined some simple and robust steps to get XDebug working with Netbeans 8 on Ubuntu 14.04.
Install XDebug
There are 3 steps to this :
- Install the Xdebug extension.
- Configure it.
- Verify.
To install, run this in your shell : sudo apt-get install php5-xdebug
Modify the `xdebug.ini` file. This is usually in `/etc/php5/mods-available/xdebug.ini`. Set it to :
[xdebug]
zend_extension=xdebug.so
xdebug.default_enable=1
xdebug.remote_enable=1
xdebug.remote_handler=dbgp
xdebug.remote_host=localhost
xdebug.remote_port=9000
xdebug.remote_autostart=1
Verify that Xdebug has been installed. Run the php -v command and look for the ‘with Xdebug‘ line. Like here:
php -v
PHP 5.5.9-1ubuntu4.9 (cli) (built: Apr 17 2015 11:44:57)
Copyright (c) 1997-2014 The PHP Group
Zend Engine v2.5.0, Copyright (c) 1998-2014 Zend Technologies
 with Zend OPcache v7.0.3, Copyright (c) 1999-2014, by Zend Technologies
 with Xdebug v2.2.3, Copyright (c) 2002-2013, by Derick Rethans
Make sure you see it, or Xdebug has not been installed and the rest of this tutorial won’t work for you!
Here everything so far in copy-paste form :
sudo apt-get install php5-xdebug;
sudo sh -c "echo '[xdebug]
zend_extension=xdebug.so
xdebug.default_enable=1
xdebug.remote_enable=1
xdebug.remote_handler=dbgp
xdebug.remote_host=localhost
xdebug.remote_port=9000
xdebug.remote_autostart=1' > /etc/php5/mods-available/xdebug.ini" ;
php -v | grep Xdebug
Configure Netbeans
Now configure Netbeans :
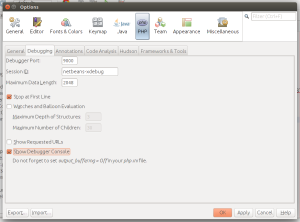
- Click on Tools > Options > PHP > Debugging
- Check ‘Stop at First Line‘ and ‘Show Debugger Console‘
The ‘Stop at First Line’ option provides us quick feedback on whether the hook up worked. Otherwise you need to set a breakpoint in your code for it to actually stop there. Once the setup has been verified you can uncheck this option.
Setup a Debug Session
To run a debug session you need to create a ‘Run Project’. This is just a configuration setting that tells Netbeans how to start your code properly with the debugger. I’m using a Symfony project, so I’m going to demonstrate debugging a test case with PHPUnit :
- Click on Run > Set Project Configuration > Customize
- Click ‘New‘. Give a name, say ‘PHPUnit’
- Run As : Set it to ‘Script (run in command line)‘
- PHP Interpreter : Use the default, this is usually `
/usr/bin/php5` on Ubuntu. - In Index File, set the full path to your phpunit.phar file.
- Press Ok.
Debug!
This is the easiest part. If you’ve done the above correctly you will be able to see Netbeans stop at the first line it finds. To debug a file :
- Click on the file and press ‘Ctrl + Shift + F5’. Or Right-click and click ‘Debug’
- [If Netbeans complains the phpunit.phar file is too large, press ‘No’.]
That’s it! From here you can :
- Create a breakpoint in your file.
- If your breakpoint is in the run path, Netbeans will now stop at your breakpoint.
- You can watch all the variables declared until that point in the ‘Variables’ tab, and inspect their values at that point. You can also see the stack trace so far. Really useful stuff!
Happy debugging!

Reblogged this on Dinesh Ram Kali..
This is great, thanks! The only additional thing I had to do for Netbeans 8.1 was set the “Working Directory” to my project root, and the path to phpunit.phar had to be relative, so this could work with a labyrinth of ../../ or just include it as a composer dev dependency then reference it at vendor/bin/phpunit
http://stackoverflow.com/a/39359249/4233593